Approximate time: 20 minutes
Learning Objectives
Use Genome Analysis Tool Kit (GATK) to call variants
Prepare the reference sequence for GATK
GATK requires a Sequence Dictionary for reference genomes used in variant calling. The sequence dictionary contains names and lengths of all chromosomes in the reference genome. The information in this file is transferred to the Variant Call File (VCF) when it is produced, so that there is no ambiguity about which reference was used to produce the file.
Let’s open a new script
nano prepare.sh
Add these lines:
module load samtools/1.9
module load picard/2.8.0

samtools faidx ref_data/chr10.fa

picard CreateSequenceDictionary \
REFERENCE=ref_data/chr10.fa \
OUTPUT=ref_data/chr10.dict
With these steps, we load the necessary modules, created a FASTA index for our reference sequence, and use Picard to create our Sequence Dictionary.
Run our script:
sh prepare.sh
Result:
[Fri May 08 16:52:35 EDT 2020] picard.sam.CreateSequenceDictionary REFERENCE=ref_data/chr10.fa OUTPUT=ref_data/chr10.dict    TRUNCATE_NAMES_AT_WHITESPACE=true NUM_SEQUENCES=2147483647 VERBOSITY=INFO QUIET=false VALIDATION_STRINGENCY=STRICT COMPRESSION_LEVEL=5 MAX_RECORDS_IN_RAM=500000 CREATE_INDEX=false CREATE_MD5_FILE=false GA4GH_CLIENT_SECRETS=client_secrets.json
[Fri May 08 16:52:35 EDT 2020] Executing as rbator01@pcomp31 on Linux 2.6.32-696.1.1.el6.x86_64 amd64; Java HotSpot(TM) 64-Bit Server VM 1.8.0_60-b27; Picard version: 2.8.0-SNAPSHOT
[Fri May 08 16:52:35 EDT 2020] picard.sam.CreateSequenceDictionary done. Elapsed time: 0.01 minutes.
Runtime.totalMemory()=2058354688
Two new files are created in the folder ref_data, our FASTA index (fai) and sequence dictionary (dict):
chr10.fa.fai
chr10.dict
Variant Calling with GATK HaplotypeCaller
GATK has two main goals:
- Separate true variants from sequencing error
- Establish which variants co-exist on a single DNA strand (haplotype)
The figure below described the 4 stages of the GATK HaplotypeCaller algorithm (from software.broadinstitute.org ).

Paraphrasing from the GATK documentation, the four stages are as follows:
-
Define active regions. The program determines which regions of the genome it needs to operate on, based on the presence of significant evidence for variation.
-
Determine haplotypes by re-assembly of the active region. For each active region, the program builds a graph to represent all possible read sequences spanning the region. For example, the top first read starts in the
TATGbubble that is common to all reads, then takes the top path to theAbubble, continues through theAAT, etc. The program then realigns each haplotype (path through the graph) against the reference sequence in order to identify potentially variant sites. -
Determine likelihoods of the haplotypes given the read data. The goal of this stage is to evaluate which haplotypes have the most read support. For each active region, the program performs a pairwise alignment of each read against each haplotype using the PairHMM algorithm, which takes into account other information about the data, such as quality scores. This produces a matrix of likelihoods of haplotypes given the read data. These likelihoods are then used to calculate how much evidence there is for individual alleles at each variant site (marginalization over alleles).
-
Assign sample genotypes. The final step is to determine which sequences were most likely present in the data. This step uses Bayes’ rule to find the most likely genotype, given the allele likelihoods calculated in the last step.
Run GATK on our BAM file
To load the module on our system, we’ll type:
module load GATK/3.7
We can check the usage for GATK, which has many tools in addition to HaplotypeCaller:
gatk --help
The result shows the many different tools inside GATK. The relevant lines for HaplotypeCaller are:
…
usage: java -jar GenomeAnalysisTK.jar -T <analysis_type> …
…
 haplotypecaller
   HaplotypeCaller               Call germline SNPs and indels via local re-assembly of haplotypes
   HaplotypeResolver             Haplotype-based resolution of variants in separate callsets.
For tool specific help, we type:
gatk -T HaplotypeCaller --help
Let’s write a new script:
nano gatk.sh
Add these lines, which specify the reference file, input BAM, and output VCF.
module load GATK/3.7

gatk -T HaplotypeCaller \
-R ref_data/chr10.fa \
-I results/na12878.srt.markdup.bam \
-o results/na12878.vcf
Run our script:
sh gatk.sh
Result:
INFO  17:17:41,656 HelpFormatter - -----------
INFO  17:17:41,660 HelpFormatter - The Genome Analysis Toolkit (GATK) v3.7-0-gcfedb67, Compiled 2016/12/12 11:21:18
…
Two new files have appeared in our results folder, the variant call file (VCF) and index file, respectively:
na12878.vcf
na12878.vcf.idx
VCF format
We can take a look at the first few lines of our vcf file:
cd results
head na12878.vcf
VCF, like BAM files, files contain two sections: A header section, indicated by the presence of # at the beginning of the line,
followed by data lines for each variant that was called.
##fileformat=VCFv4.2
##FILTER=<ID=LowQual,Description="Low quality">
##FORMAT=<ID=AD,Number=R,Type=Integer,Description="Allelic depths for the ref and alt alleles in the order listed">
##FORMAT=<ID=DP,Number=1,Type=Integer,Description="Approximate read depth …
##FORMAT=<ID=GQ,Number=1,Type=Integer,Description="Genotype Quality">
##FORMAT=<ID=GT,Number=1,Type=String,Description="Genotype">
##FORMAT=<ID=PL,Number=G,Type=Integer,Description="Normalized, Phred-scaled likelihoods for genotypes …
##GATKCommandLine.HaplotypeCaller=<ID=HaplotypeCaller,...
….
##contig=<ID=chr10,length=135534747>
##reference=file:///cluster/home/tutln01/intro-to-ngs/ref_data/chr10.fa
#CHROM	POS	ID	REF	ALT	QUAL	FILTER	INFO	        FORMAT	    NA12878
chr10	96521422	.	A	G	60.28	.         AC=2;AF=1.00; ….  GT:AD:DP:GQ:PL  1/1:0,3:3:9:88,9,0
chr10	96522365	.	T	C	1134.77	.         AC=1;AF=0.500;….  GT:AD:DP:GQ:PL  0/1:47,37:84:99:1163,0,1502
The header lines explain the meaning of notation found in the body section of the VCF, as well as information about the reference and software used to produce the VCF. The last header line lists the column titles for information, and the last column has the sample name. VCF can be used to represent multiple samples, and in that case, each sample would have it’s own subsequent column.
Let’s look at the body section in table format:
| CHROM | POS | ID | REF | ALT | QUAL | FILTER | INFO | FORMAT | NA12878 |
|---|---|---|---|---|---|---|---|---|---|
| chr10 | 96521422 | . | A | G | 60.28 | . | AC=2;AF=1.00; …. | GT:AD:DP:GQ:PL | 1/1:0,3:3:9:88,9,0 |
Fixed fields (same for all samples in the VCF) CHROM - Chromosome POS - Position ID - Identifier. May be present if the VCF was annotated with known variants, for example, rs numbers from dbSNP. REF - Reference sequence base ALT - Alternate base, comma separated list of non-reference alleles (usually) found in the samples represented by the VCF QUAL - Phred scaled quality score for the variant, i.e. $10log_{10}$ prob(call is wrong). FILTER - PASS if this position has passed all filters, otherwise the name of the filter islisted. INFO - Additional information
Genotype fields (one per sample):
FORMAT - This field specifies the format that will be used to give information in each sample column.
VCF can represent In this case, we see GT:AD:DP:GQ:PL, which corresponds to the values 1/1:0,3:3:9:88,9,0.
GT - Genotype, encoded as allele values separated by either ‘/’ (unphaseD) or ‘|’ (phased - known to be on the same chromosome arm). The allele values are 0 for the reference allele
and 1 for the first allele listed.
AD - Allele depth at this position for the same, reference first followed by first allele listed
DP - Read depth at this position for the sample
GQ - Genotype quality
PL - Genotype liklihoods
For more on the rich VCF format, see the VCF format specification from Samtools
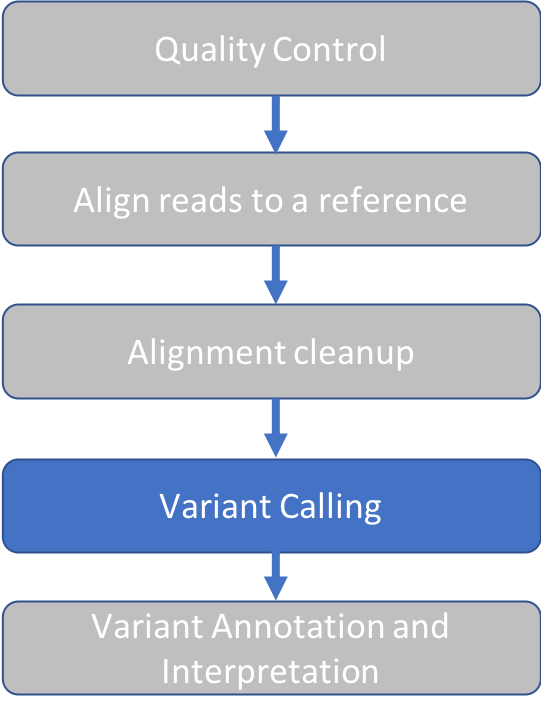
VCF Quality Control
It’s always a good idea when writing a new pipeline, to ask: How well did our variant calling perform? In this case, the best way to check the performance would be to compare the variants we called in this exercise matched the “known” variants for NA12878 in the NIST callset. That exercise is beyond the scope of this workshop.
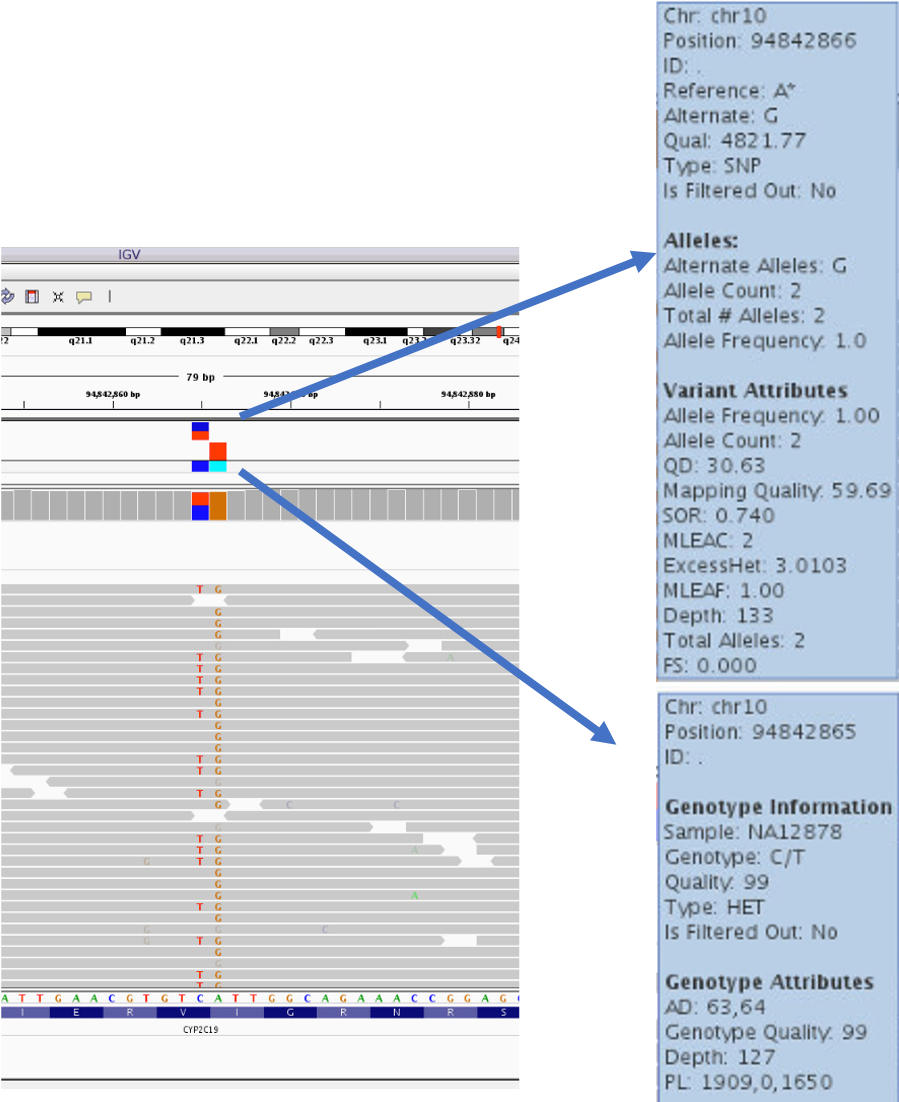
Add our VCF to IGV
We can add a VCF track to our IGV windows.
- Go to back to IGV on demand
- Click the
Filemenu and selectLoad from File - Select the file
na12878.vcf

- We’ll see a variant track appear above the coverage track. Hover over the colored blocks on the variant track in order to see the information in the VCF.
Summary
